Do it once (and only once) with workflow automation
Repetitive tasks are not only mind-numbing; they increase opportunities for introducing data errors.
Spy on Any Website

There’s a concept in productivity philosophy that suggests you “only handle it once” (OHIO) — the idea is that you immediately deal with whatever crosses your desk rather than wasting time by setting it aside and getting back to it later. When designing workflows for myself and my team, I like to take this a step further and set up processes in such a way that people need only do a simple task a single time.
“Why would you do something more than once?” you might ask. You may not think of it that way, but, in many cases, everyday work involves doing the same thing several times. For example, you mark a task as done in your product management software, then send an email to your colleague to let them know it’s complete. You enter content into the CMS for your website, then copy the same content to the system you use for your mobile site. Not only is this kind of thing inefficient, but every time you’re entering or copying data from one system to another, you risk introducing errors.
In my last article, I explained how I save new contacts’ information by entering it into a form that then updates a variety of different systems. This time, I’ll walk you through a few more examples, explaining the automation tools that enable them.
Cross-posting from one website to another
At one time, we’d frequently cross-post content from one of our sites to another whenever the article would be of interest to both audiences. Rather than start completely from scratch, I designed a workflow where editors would select a certain category in WordPress (which wouldn’t be displayed on the site) to indicate that a piece should be published on both sites.
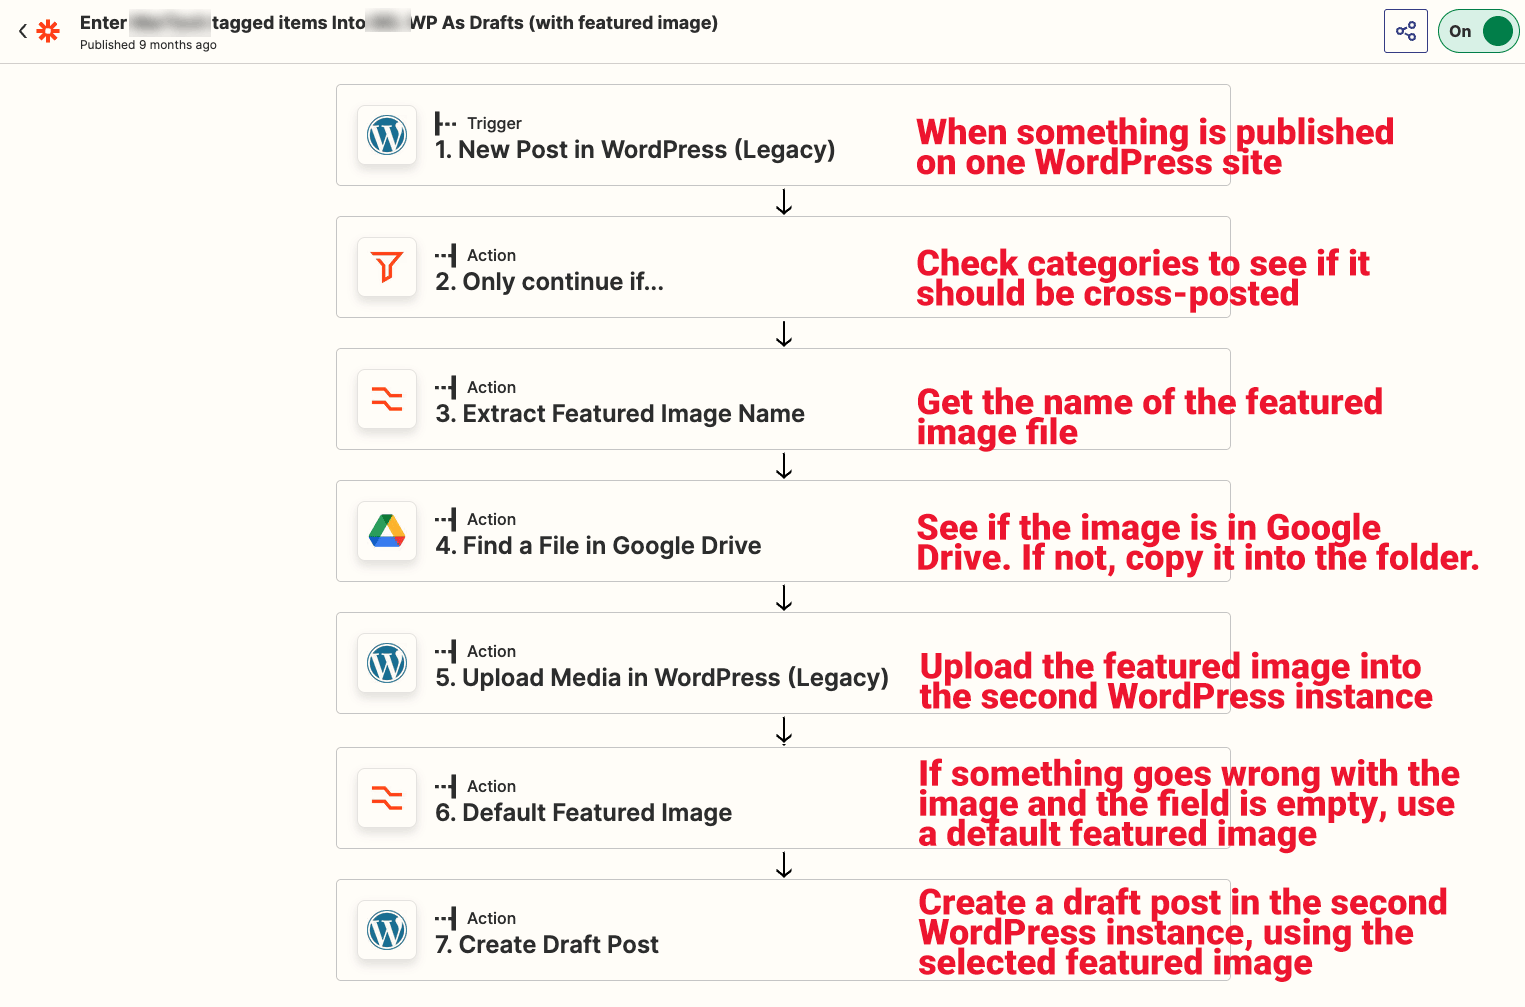
The annotated screenshot above, along with this shared Zap, gives you a sense of how this worked. The trigger setting the workflow in motion was the publication of any article on the first site. The first thing Zapier did, using its built-in filter function, is to see whether the requisite category was checked. If not, nothing more would happen.
If the Zap continued, it next copied over the featured image associated with the article. This took several steps, in part because we were getting a lot of time-out errors on the second site. We solved this, for the most part, by getting the name of the featured image file, downloading the image to our Google Drive if there wasn’t already a file with that name in the folder, then uploading that image to the second WordPress site.
We continued to have time-out problems, so I set up a step whereby if the image wasn’t uploaded successfully to the second WordPress site, a default generic image would be selected instead. This kept the process rolling along rather than getting stuck on an error.
Finally, the system would create a new post on the second WordPress site, copying over the headline, body copy and featured image. The rest of the images within the article were still hosted on the first site, which we’d decided we were OK with. The resulting post was set to Draft status rather than automatically published because we did have to do a few things manually.
The manual part (and why)
First, you may notice the process doesn’t address the question of authorship. Because WordPress stores authors as ID numbers, and because our author IDs differed from one site to another, we couldn’t just copy an ID over. At one point, we did a lookup in Google Sheets that matched ID numbers from one site to another, but that ended up being difficult to maintain so we went with selecting the author by hand.
Our categories and category IDs differ from one site to the other, too, which means we categorized the articles after they’d been copied over to the second site. In addition, we went into the Yoast SEO plug-in and designated the original URL as canonical. This also gave us the opportunity to check the article over to ensure everything functioned as intended before publishing.
Recommended Articles

Making form submissions go further
The submission of a form is a fantastic time to trigger other events. For our MarTech Intelligence Reports, we use a form to gather information about software vendors in the categories we cover. When someone we’ve asked to fill a questionnaire hits submit, this triggers a number of processes.
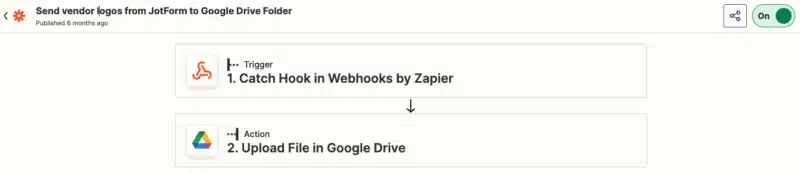
- The company logo they’ve uploaded gets added to a Google Drive folder set up for this purpose.
- The answers are copied into a Google Doc, which serves as the starting point for a vendor profile. Internal parties receive an email notification with a link to the draft.
- The submitter receives an email acknowledgment.
- The status of the ClickUp task representing that vendor profile is automatically updated to indicate that we’ve received the form submission
- A comment is posted to the ClickUp task with a link to the draft document.
- The vendor’s analysis of industry trends goes into my unstructured data store tool, Mem, so I can tap it when writing the analytical part of the report.
- The submitter’s name, company and email address are added to my directory of contacts.
I’ll walk you through a few of these processes so you can see how it all happens.
Even though we cover a lot of different software types in our MarTech Intelligence Reports, we use a single questionnaire to gather info from vendors. That questionnaire uses conditional logic to ensure the right questions appear for the correct category. This means that when we make a change to a question that’s required for every vendor, we don’t need to change it 12 times in 12 different forms. We also use a hidden field to link the form to the task for which it is being submitted using a task ID.
Uploading the company logo (number 1 above) uses a simple JotForm function to call a webhook at the time of submission, sending the uploaded image to the proper Google Drive folder.
Creating a Google Doc draft from the form input (number 2) uses native JotForm functionality to send an email with form data when it’s submitted. One general challenge with these form submissions is that even though the conditional logic prevents certain questions from appearing to the person filling out the form, those questions (and blank answers) are output whenever you export the form data. And as we expand to cover new categories, this issue grows larger.

We get around this by utilizing the native email notification feature, which is set to only include fields that are completed. The email goes to a Zapier tool called “Email Parser by Zapier” that parses the email with all the questions and answers (but only the relevant ones, because the blank ones weren’t sent over) and copies plain text into a Google Doc.
It’s not formatted very nicely, but it’s a good head start, putting the answers into the tool we will use to write the profile. That same Zap emails the team working on the report with a link to the Google Doc so we can get to work.
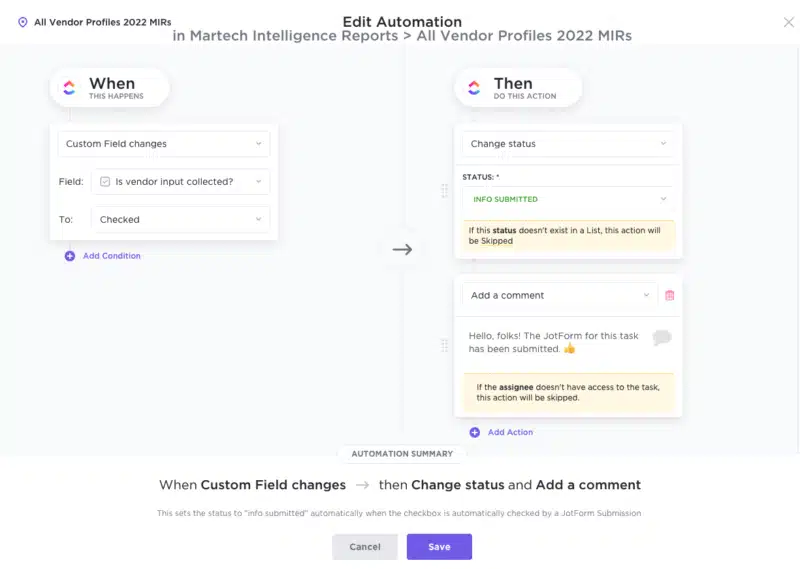
Automatically setting the status of the ClickUp Task (number 4) is something I’ve only recently implemented and I’m really finding it useful. The form submission triggers a webhook from Zapier that passes over the task ID number from the hidden form field. That sets off a POST to the ClickUp API that checks a box in the linked task to indicate that the form has been submitted.

I’m using the API instead of the native Zapier ClickUp integration because the native connector requires me to designate a space, a folder and a list for each Zap. Because of the way our tasks are organized in ClickUp, this means I’d need a separate Zap (or some other functionality) for each report. With the API, I only have to specify the unique ClickUp task ID to work with that task.
For whatever reason, though, the API doesn’t allow me to change task statuses. So I have a checkbox within the task record that essentially asks “is the form submitted?” and that box is checked through the API when it is. Then, I use native ClickUp automations to change the task status to “Info Submitted” and put a little comment on the record alerting the assignee.
This process doesn’t “know” about the other Zap that creates the Google Doc, however, so another API call (number 5) is for connecting the task and the draft. Whenever a new Doc is created in the designated folder, Zapier parses the title of the document and extracts the task ID (which I’ve set up to be the last part of the title).
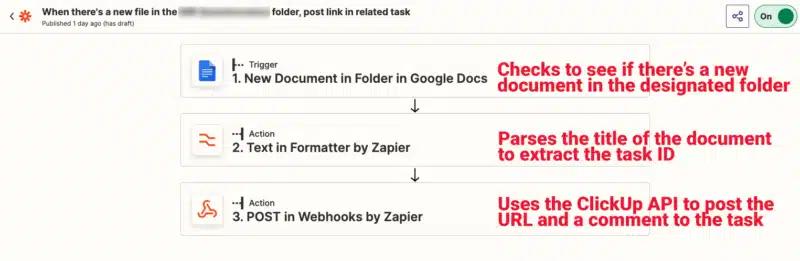
With that task ID, it uses the ClickUp API to POST a new comment to the task providing the assignee with the Google Doc URL.

As I explain this, I realize that I probably ought to combine number 2 and number 5 into a single Zap. See? We’re all learning together!
Is all this worth the trouble?
As you can see, there is a lot of detail work involved in setting up these workflows and, like any other computer process, it’s not very forgiving — include an extra space or leave off a slash mark and that’s the whole thing scuppered.
That said, if you’re automating processes your team encounters over and over in the course of their daily grind, it’s well worth the trouble of the initial setup. We’re doing 12 MIRs this year and each one of them has somewhere between ten and 22 profiles, so it’s worth it to me to set this up once and potentially benefit 286 times in 2022 alone. Once automated workflows like this are functioning smoothly, they eliminate a lot of mind-numbing repetitive work and let you focus on more creative, strategic tasks.
MarTech is owned by Semrush. We remain committed to providing high-quality coverage of marketing topics. Unless otherwise noted, this page’s content was written by either an employee or a paid contractor of Semrush Inc.
Pamela Parker is Research Director at Third Door Media's Content Studio, where she produces MarTech Intelligence Reports and other in-depth content for digital marketers in conjunction with Search Engine Land and MarTech. Prior to taking on this role at TDM, she served as Content Manager, Senior Editor and Executive Features Editor. Parker is a well-respected authority on digital marketing, having reported and written on the subject since its beginning. She's a former managing editor of ClickZ and has also worked on the business side helping independent publishers monetize their sites at Federated Media Publishing. Parker earned a master's degree in journalism from Columbia University.
View Author ProfileAdd us as a preferred source on Google
Google's "preferred sources" feature allows users to customize their search results by selecting news outlets they want to see more often in the "Top Stories" section.
Add Martech NowRelated Articles
The right metrics connect marketing operations to pipeline, efficiency and financial outcomes the C-suite recognizes.
Read MoreMarketing artificial intelligence (AI)
4 minutes readAdobe and Canva are rolling out AI tools that turn design into conversation, intensifying competition and reshaping how marketers create.
Read More
Prepare your systems for multishore scale with three audits covering workflows, technology and stakeholder alignment.
Read More
What looks unified in CreativeOps can hide layered dependencies that affect cost, control and performance as your operation scales.
Read MoreRelated Articles
The right metrics connect marketing operations to pipeline, efficiency and financial outcomes the C-suite recognizes.
Read MoreMarketing artificial intelligence (AI)
4 minutes readAdobe and Canva are rolling out AI tools that turn design into conversation, intensifying competition and reshaping how marketers create.
Read More
Prepare your systems for multishore scale with three audits covering workflows, technology and stakeholder alignment.
Read More
What looks unified in CreativeOps can hide layered dependencies that affect cost, control and performance as your operation scales.
Read More