How to increase your PageSpeed in WordPress
With over 59% of websites using WordPress as a CMS, optimizing them to load quickly is a good idea. Contributor Dave Davies walks through key steps and shows how to optimize a WordPress site for Google PageSpeed.
 We hear a lot about PageSpeed from Google, and there’s no doubt it’s an important metric from both a usability and an SEO standpoint. Of course, there’s a lot more to the web than WordPress, but with it now powering over 59.3 percent of the web and Google dedicating an engineering team to work with WordPress, it deserves special attention.
Before we dive in, it’s important to clarify that in our article today we’re going to be focusing on PageSpeed, and not page speed.

For those unfamiliar with the difference, PageSpeed is a Google metric. It’s based on a family of tools, and when we’re referring to a PageSpeed number between 0 and 100, we’re referring to the output of the PageSpeed Insights tool.

Page speed, on the other hand, generally refers to the real-world speed of a web page. And yes, it’s possible to increase one without the other, and I’ve even seen cases where improving one is at the cost of the other.
In short, we’re going to focus on the Google metric in this article as it relates to WordPress sites. Whenever you are working on one, it’s important to be measuring the other, too, so as not to shoot yourself in the foot.
One-or-the-other metrics
While I’ll be drawing on my experiences with impacting PageSpeed or page speed, my experiences are drawn from a scenario I have never seen or been involved with before. I am going to run this little experiment while writing this article so I can provide screen shots and output numbers.
It is worth noting that as I write this, I do not know where we’ll end up regarding final numbers. We’re shooting for 80+ to hit the “Good” level, but that isn’t always possible. I consider anything above 70 to be reasonable, as it gives a bit of wiggle room to drop over time and stay above the 60 threshold, where we drop into the “Low” grade.
I can’t give the specific URL in this exercise, and you won’t see the starting numbers by the time you read this, but I want to stress again that I have never seen this specific scenario or anything this low before. I am going to use Search Engine Land as a placeholder in some of the screen shots, but this little experiment is being run on a different URL.
Here’s what we’re starting with:
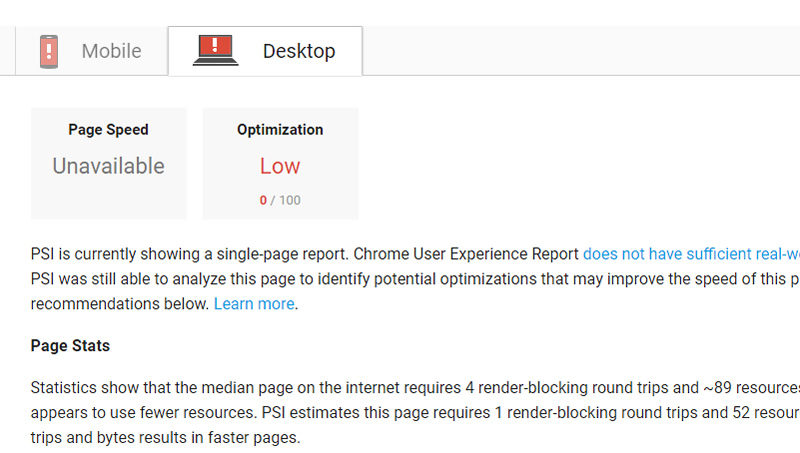 The scores to begin with are:
- Mobile: 57/100
- Desktop: 0/100
And yes, I’ve checked multiple times over multiple days; the report continues to show a score of 0 for the desktop! Not good. Your goal is to get as high a score as possible, with a score of 80 as the starting point for a page to be rated “Good.”
We’re also going to look at the time the page took to load, or the speed of the page, as it were. I’ll include those numbers beneath improvement metrics as well.
It’s important to note that each tool measures differently. I’ll be basing my numbers on Dotcom-Tools.com, but GTmetrix.com works just as well.
The reason I use Dotcom is that it tests from multiple locations around the world, and the number I’m giving is the average.

Step 1: HTTPS
The first step kills two birds with one stone. The site has a secure certificate supplied and installed by the registrar. And they did a fine job, except that HTTP does not redirect to HTTPS, and Google has the HTTP version cached.
The first step is to get the site fully switched over to HTTPS. In our case, the site setting simply hadn’t been switched to HTTP in General Settings.

Switching the address to HTTPS created the 301 redirect, and the settings immediately jumped to:
- Mobile: 61/100
- Desktop: 0/100
Before we began, we had a page speed of 10.1 seconds. To give you an idea of what I was referring to above about multiple worldwide locations, from Denver it loaded in 3.5 seconds. After switching to HTTPS, the page speed bumped to 9.4 seconds.
If the site doesn’t automatically redirect, there’s the plugin called Force HTTPS to get the job done. Or you can, if you’re comfortable with it, add the following to your .htaccess file:
RewriteEngine On

RewriteCond %{SERVER_PORT} 80

RewriteCond %{HTTP_HOST} ^(www\.)?domain\.com

RewriteRule ^(.*)$ https://www.domain.com/$1  [R,L]
You’ll obviously want to switch the code from domain.com to your URL.
Step 2: Images
Anyone who’s ever tackled PageSpeed will tell you images are the most common culprit for slowing pages down. In our case, we see …
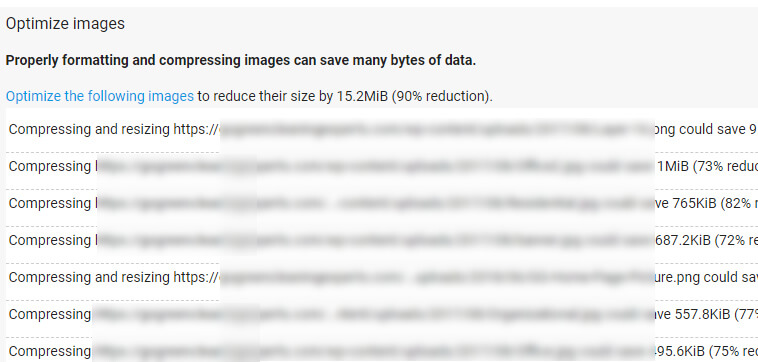
You read that right — over 15 unnecessary MiB.
The images fall into two categories of error:
- Compressing and resizing. This means that the images are physically larger than they need to be. This happens a lot in WordPress when an image is added to the Media Library and placed on the page at a size far larger than it needs to be for the dimensions it’s occupying.
- Compressing. Images have a ton of junk in them, and for the web, they can often be of far higher quality than needed. Image compression deals with this. As a word of warning, if you ever use an automated image compression system try to always check and make sure the image comes out looking the way you want. It’s rare, but I’ve encountered cases where there was a noticeable degradation of the quality.
I generally either use my image editing tools or Compressimage.toolur.com and do them manually. I’ll be using TinyPNG.com for the metrics in this article.
After optimizing one large image from 9.2MB down to 175 KB with no visual impact on the page, just by optimizing the images, we got the score to:
- Mobile: 61/100
- Desktop: 67/100
For page speed, we’re now coming in at 5.5 seconds, or about twice as fast.
Images weren’t the biggest issue on mobile for PageSpeed, but they were easily the biggest on the desktop. Now both scores are in the OK range.
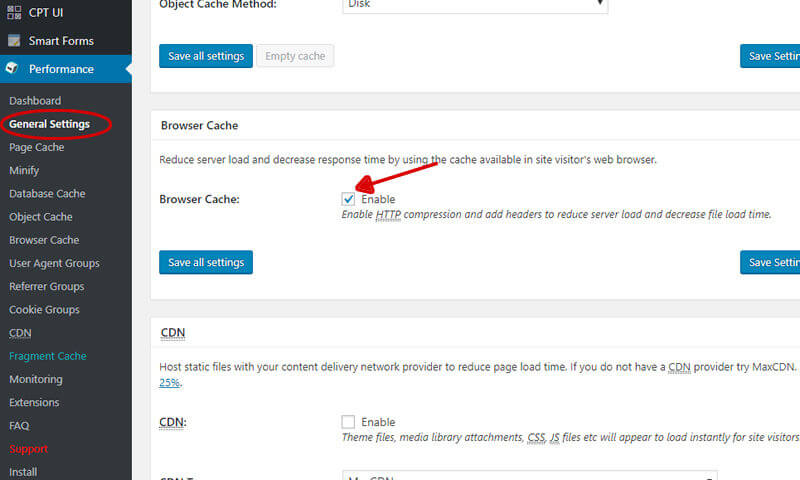
Step 3: Browser caching
For those going through this process for the first time, if you see browser caching as an issue, Google is suggesting you tell your visitors how long their browsers should keep specific resources.
For example, you can send a message to the browser that images can be cached for two weeks. This way, when a visitor returns to your site within two weeks, the site loads more quickly, as many of the resources are simply being pulled from their own machine.
You can set time limits for caching of most resources, ranging from scripts and style sheets to most types of images.
There are two methods I tend to use when setting up browser caching: setting up directly in the .htacess file and via plug-in W3 Total Cache.
Directly in the .htaccess File
You can add some code to your .htaccess file when setting up browser caching, but a word of warning: If you’re not sure what a .htaccess file is, you’re probably better off going the plug-in route outlined further below.
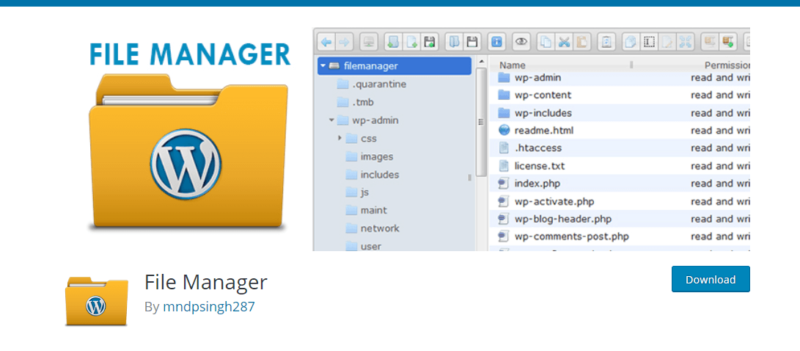
If you decide to go old school and code .htaccess, you’ll need to access the site via either FTP, or, if you don’t have FTP access, you can install the plug-in WP File Manager, which grants access to the files.
You will be adding the following to your .htaccess file:
## Start browser caching ##
ExpiresActive On
ExpiresByType image/jpg “access 1 month”
ExpiresByType image/jpeg “access 1 month”
ExpiresByType image/gif “access 1 month”
ExpiresByType image/png “access 1 month”
ExpiresByType text/css “access 1 month”
ExpiresByType text/html “access 1 month”
ExpiresByType application/pdf “access 1 month”
ExpiresByType text/x-javascript “access 1 month”
ExpiresByType application/x-shockwave-flash “access 1 month”
ExpiresByType image/x-icon “access 1 year”
ExpiresDefault “access 1 month”
## End browser caching ##
You can adjust the access time frames as necessary. You would do this if you need resources refreshed in a shorter period of time. An example of this might be if images change periodically but retain the same filename.
Here’s how to add the code:
Resulting in:
- Mobile: 62/100
- Desktop: 72/100
Browser caching via the plug-in got us a real speed of 5.1 seconds.
Via W3 Total Cache
There are a few caching plug-ins, the most popular being W3 Total Cache and WP Super Cache.
I’ve found W3 Total Cache to provide better results across a wider array of tasks in most but not all scenarios. It never hurts to try both or others to maximize your results.
Once you’ve installed the plug-in, enabling browser caching is pretty much as easy as going to the general settings, ticking a box and clicking “Save all settings.”
Enabling browser caching via the plug-in produced the same PageSpeed scores, and the real page speed was also unchanged.
Step 4: Reduce server response time
Often, we can hit scenarios where we’re being told to reduce the time it takes for the server to respond. You might worry you need to upgrade your hosting environment, but this is very often unnecessary.
One of the main issues that slows down a server is all the messy back-and-forths between the PHP files and the database. Thankfully, W3 Total Cache offers a solution in the form of page caching. In fact, this can speed things up even if you’re not getting the server response warning.
With page caching, we are essentially creating a static copy of a page rather than requiring the server to generate the page on each visit. This takes a significant load off the server. In the case we’re addressing here, we had the server response issue, with Google reporting a 0.6 second time to respond and Dotcom Tools reporting the first-byte time of 573 milliseconds.
I turned on page caching:
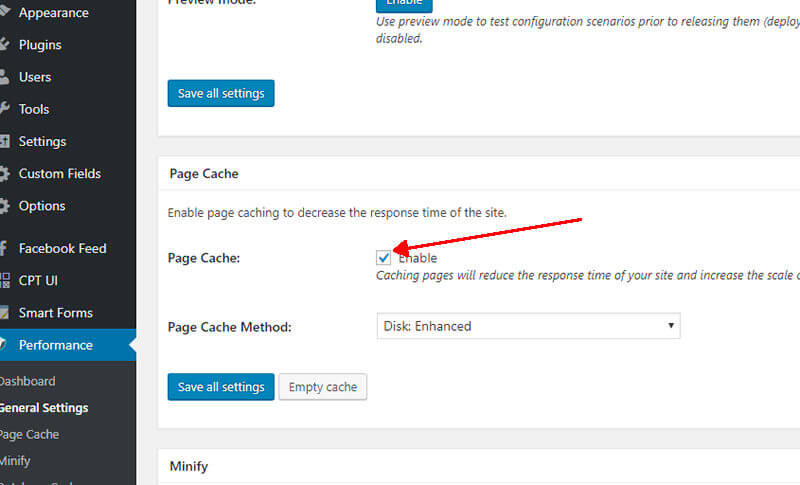
And suddenly we were at:
- Mobile: 70/100
- Desktop: 74/100
The first-byte time dropped to 75 ms. It’s worth noting there are customization options for this feature in the Page Cache settings. You can select the pages that are and aren’t cached there — among other things.
IMPORTANT: Remember that you’re creating cached pages, which means they don’t change. When you update a page, W3 Total Cache is configured to clear the cache for that page and rebuild it. However, more global changes like menus, widgets and so on can be updated without the cache clearing. If you make a change and don’t see the update live, simply click any of the “purge cache” or “empty cache” buttons in the plug-in area and you’ll be set.
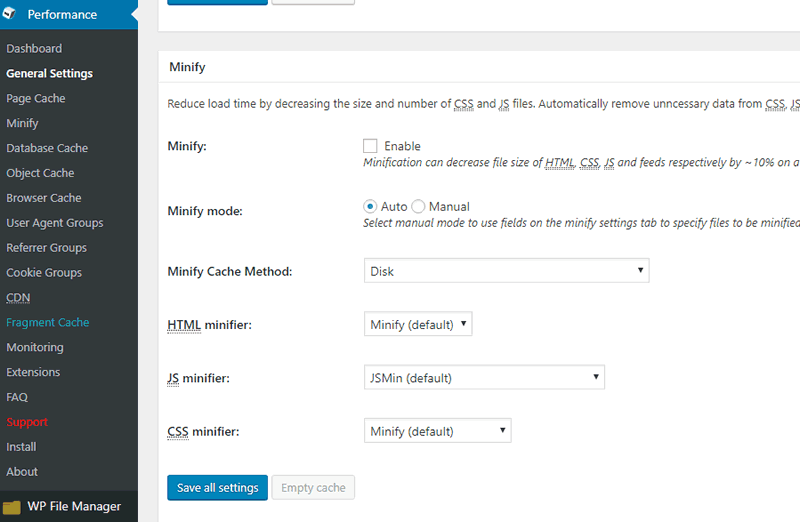
Step 5: Minification
If you’ve ever peeked at the files making up your web page, you’ll see most have multiple lines and empty spaces. Each of these adds bytes to files. Removing these bytes is referred to as minification.
The three core types of minification that apply to WordPress sites are:
- HTML. Code of the actual pages themselves.
- CSS. Code within your styles sheets.
- JavaScript. The code within your various scripts.
IMPORTANT: Whenever you minify files, especially the scripts, it’s incredibly important to visit the pages of your site that rely on them to ensure they continue to function properly.
The first method you can use is to download the minified files themselves from Google:
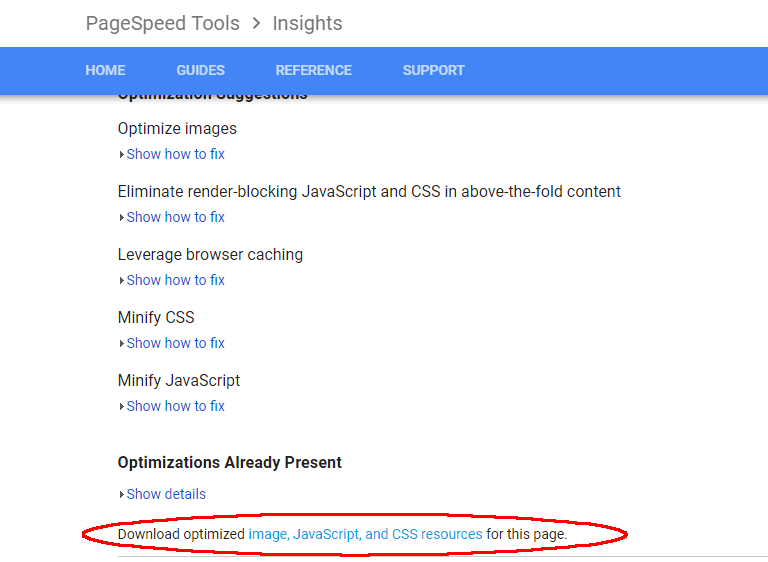
It includes the images, but interestingly, I don’t find it does as good a job as the methods referenced above. You can download the minified version of the JavaScript and CSS here, but a problem can pop up if you update the plug-ins that created the scripts. You’ll have to do it all again.
Along the same lines, you can use tools like CSSMinifier.com or JavaScript-minifer.com.
Just keep in mind that if the plug-in updates, and that update had anything to do with the script or styles, you’ll have to exclude the references that call the original files in the code. This can be annoying.
The alternative is to once more return to W3 Total Cache, which includes the function in the general settings (though you’ll need to head into the advanced settings here as well). You’ll find them at:
I highly recommend minifying them one at a time and testing the site between each. If you find things break, you can head over the minify settings and test the exclusion of specific scripts and styles sheets:

You can also just exclude pages if you find it causes problems with a specific page like the contact page or a slider. Can you tell where I’ve found the biggest issues?
Most of the time this will work, but occasionally, you’ll find that it doesn’t (as it didn’t in the scenario we’re currently working on, but it’s a good first step). If it doesn’t improve things, I recommend the plugin Autoptimize to accomplish the same task.
With this plugin our scores are now:
- Mobile: 70/100
- Desktop: 75/100
This is one of the scenarios where we saw an improvement in PageSpeed with no improvement in real site speed.
And that’s it
You may find, as we have here, there are issues you can’t fix. Google isn’t giving us a 100 percent, and here’s why:
- Optimize images. They’re as small or smaller than those Google themselves provides, though I used the tools above. Any further compression results in the images looking degraded.
- Eliminate render-clocking JavaScript and CSS in above-the-fold content. The only remaining issue here was a style sheet that resulted in a rendering of the page quite poorly for about a second before the styles were applied. I wanted to be realistic in the numbers I was giving, and I would not move it on my site unless I was stuck with speeds well into the “Poor” category. Always put users before engines.
- Leverage browser caching. We have leveraged browser caching, but unfortunately, that only applies to scripts pulled in from our own sites. We can’t leverage browser caching for external scripts, such as those from Facebook or Google, as were the cases here.
Our final real-world speed at the end is 3.0 seconds and better in most of North America, with the lowest coming in at 2.2. To speed this further, we’d need to look at cleaning our WordPress code, choosing a faster host and/or deploying a CDN.
But that’s another story for another article.
Opinions expressed in this article are those of the guest author and not necessarily Search Engine Land. Staff authors are listed here.
Related stories
New on Search Engine Land
About the author